
Managing a PostgreSQL Database with QGIS
Managing a PostgreSQL Database with QGIS
This article is a follow-up to my tutorial on deploying an open-source GIS architecture on AWS. In this post, I will discuss managing your GIS architecture. The good news is that managing the geodatabase is much less complicated than setting it up, and the tools in QGIS make database management tasks super easy.
Geospatial Database Basics
I want to begin by clarifying a couple of commonly used database terms. First, schemas are a way to organize related data. You can think of them as file folders in your database to store tables and create rules among the contents within. Tables are used to store the spatial and nonspatial data within the schema. Tables are synonymous with the feature classes you use in a desktop GIS application.
Creating schemas and tables can be done with both pgAdmin and QGIS. To add a new schema in pgAdmin, connect to your database, expand the server catalog, right-click schema and choose Create > Schema. Give the schema an appropriate name.

Managing a PostGIS Database with QGIS
While you can do a lot of management tasks in pgAdmin, I prefer QGIS for managing PostGIS because it is similar to the ESRI database management tools for ArcSDE and file geodatabases. It feels more native to me based on previous experiences.
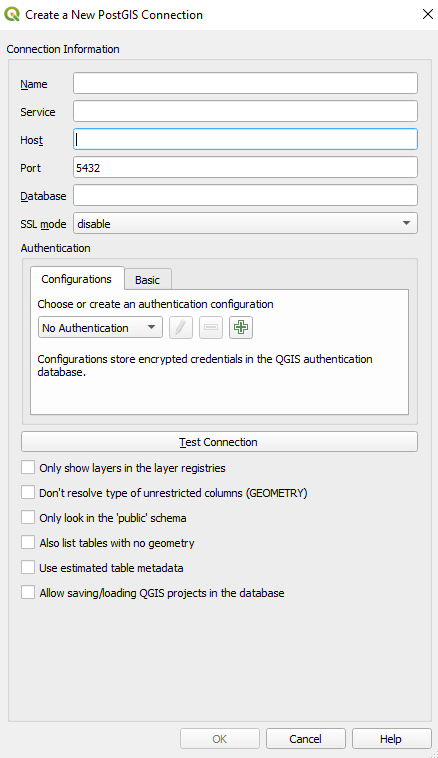
You will first need to connect to the database. From the Browser pane, right-click PostGIS and select New Connection. You can also use the PostgreSQL tab in the Data Source Manager. The database connection dialog will appear. First, give the connection a name. The name can be anything you want as long as it helps you distinguish your database later from other connections. You will need to enter your host IP and the database name. The host can be found back in pgAdmin under the database properties or on the AWS console under the RDS’s Connectivity & security details under “Endpoint.”
This part is important. You have two methods of authentication. With the more secure method, you create an authentication configuration that will be stored on your machine with a master password. To do this, press the green plus button. You will receive a dialog asking for your NEW master authentication password. Choose a password. It is essential that you keep up with this because, as the dialog says, “Not retrievable!” You will be asked to create some information that will be associated with the master password.
To manage your master password, go to the Settings menu and select Options. Go down to the Authentication tab on the left. You will see the master password you just created. You can delete authentication files and change passwords from this dialog. In the event you lose your password. I believe you can come here and delete the authentication and reconnect to the database.
The less secure alternative authentication method is to enter the user name and password you set for the database. The problem is that your credentials will be stored in a text file associated with the QGIS file. Anyone who has access to your QGIS file will have your database credentials as well.
No matter which authentication method you use, you will need to test the connection. Press the Test Connection button towards the bottom of the dialog. You will be asked to enter your database credentials at this point if you used the second less secure method above.
You will receive a message telling you if the connection was successful at the top of the form. Select the OK button if the connection is successful.
Additional Connection Options
There are a few options at the bottom of the connection dialog. The two that are probably most worth mentioning when just getting started are the “Also list tables with no geometry” and “Allow saving/loading QGIS project in the database.” With the first option, you can store nonspatial tables in the database which will enable you to query the tables in the DB Manager. Similarly, the second option will let you store QGIS projects in the database. Keeping the projects in a database will give you access to the project’s metadata using the SQL window in DB Manager.
Adding Schema and Tables to Your Database
Now that you have set up the connection, you are ready to begin working with the database. There are two ways that you interact with PostGIS using QGIS, through the Browser pane or the DB Manager available from the Database file menu. The Browser pane has somewhat limited options. Right-clicking will give you the ability to create a new schema or table.

Adding schemas and tables from the browser pane
The DB Manager provides additional functionality beyond that of the Browser pane. First, it gives you the ability to import and export spatial and nonspatial data. The Import Layer/File feature button is available on the DB Manager’s tools. To import a shapefile, click the ellipse next to the input and navigate to the file’s location. Select the .shp file or import from a zipped shapefile.
The DB Manager’s Schema menu allows you to create and delete a schema. The Table menu will enable you to create new tables and provides additional functionality. You can edit the tables, such as adding and removing columns. With the table menu, you can create primary key constraints and create indexes, allowing spatial queries to run faster. You can also use the Table menu to move a table to another schema in the database.
Note: PostgreSQL prefers that table and column names be lowercase. Keep this in mind when creating or importing data. Also, it is important to make sure that each of your tables has a primary key.

My favorite tool in the DB Manager is the SQL Window, which is available by clicking the page and wrench icon or in the Database menu. From this view, you can run SQL queries on the database. Once you have selected your data, you can load it into QGIS. You can then store the loaded data back into your database with the DM Manager’s Import Layer/File command. In addition to the standard SQL, you can also run spatial queries.

Notice I had to change the “Test” schema to “test.” I was able to create a schema with a Capitalized name, but QGIS would let me query the table within. So I had to rename by right clicking the schema in DB Manager.
Final Thoughts
This article is intended to be a basic introduction to managing a PostGIS server with QGIS. There are many other features beyond what I have covered, which I plan to explore in the future, such as managing the database for an enterprise application, creating versioned and disconnected editing sessions, and storing raster data. One thing I hoped to cover in this article was managing topology and domains. However, topology is not a standard feature out of the box. It must be added with an extension. I was a little disappointed by this because I find it to be such a valuable feature of a geodatabase.
I plan to discuss using GeoServer with the PostGIS in my next post. I will cover connecting the GeoServer to the RDS and using the connection to publish your database’s tables to a Leaflet map.