
Getting Started with Your Own Open Source GIS Architecture: Setting up GeoServer and PostgreSQL with the PostGIS extension on AWS
I have worked in GIS for 20 years at a large public university and currently for a mid-sized municipality. One of the things that always frustrates me about working in GIS at a large organization is the difficulty involved in accessing new technologies and data. I’ve always thought it would be nice to have a GIS server of my own that I could experiment with and create proof concept projects and build my skills.
These issues lead me to build my open-source GIS cloud infrastructure. I wasn’t sure exactly where to start, but I knew I wanted to do it on a budget, as in free if possible. I also knew I wanted to share data with colleagues and host data to use on web applications.
I began searching the web. I found many bits and pieces of what I needed in other blogs, articles, and videos, but there was no comprehensive guide describing what I needed to do to get the job done. I struggled for several weeks before I finally had pieced together the information I needed to create an open-source GIS cloud architecture.
I am writing this tutorial to help others avoid my headaches over the last few weeks.
Step 1. Signup for an Amazon Web Services Account
This step is relatively easy. Go to https://aws.amazon.com/ and sign up for an AWS account. I believe you can use an existing Amazon account as well. In my research, I read that some deals are available to students with a .edu email address or other promotional offers. However, everything in this tutorial will be free-tier eligible.
Step 2. Create a New EC2 Instance
EC2 stands for Elastic Cloud Computing, and an instance is a virtual server that lives in the AWS EC2 cloud. There are many advantages to having your infrastructure in the cloud instead of maintaining a physical server that I will not go into here. There are other cloud providers that you could use, such as Microsoft Azure, HostGator, or DigitalOcean. I decided to use AWS because it is an industry standard, and I wanted to have skills transferable to other areas.
From the AWS Management Console, select launch and new virtual machine with EC2.

You can also Launch instance from the EC2 Dashboard.

For this tutorial, I used the Ubuntu Server 20.04 LTS, which is free-tier eligible. You could go with another distribution of Linux, but I went with Ubuntu since it seems to be widely used.

Next you will select your instance type. Again, we are going with the t2.micro that is free tier eligible.

Click next to the Configure the Instance Details. I went with the default configurations. Click next. The following dialogue will ask if you want to add storage. The default is 8 GiB. This amount of storage will be sufficient for now, and you can easily add more later if needed. The next dialogue will ask you if you want to Add Tags. I just skipped this.
This part is important. This server will host GeoServer, which will serve your GIS data to clients such as desktop GIS and websites. You are going to create a security rule that will allow GeoServer to communicate through port 8080. Select the Add Rule button. Choose Custom TCP. Enter port 8080. Choose Anywhere. Give the rule a name—select Review and Launch.

Step 3. Log in to Your Ubuntu Linux Server and Install GeoServer
Go to your EC2 instances page, and you will see the instance you created. Right Click on the Instance ID link and select Connect.
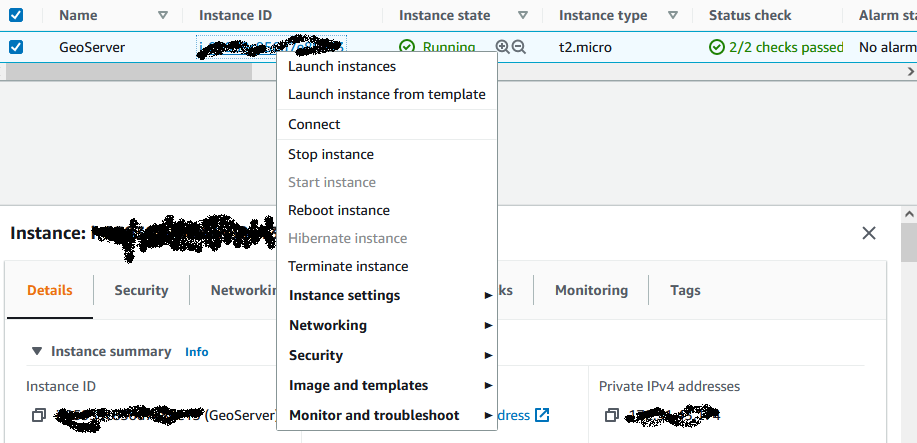
There are several different ways to connect to your instance. I chose to connect through the EC2 Instant Connect. Select that option and click the orange Connect button on the bottom of the screen. A new browser window will launch with a command-line interface of your Linux server. This might be scary to those unfamiliar with the command line, but don’t be frightened. It is easy, and this is an excellent opportunity to learn some Linux commands.
Once Linux is loaded, will begin you will begin by getting updates and do an upgrade. These steps are typical before you start working with any new Linux server. The commands are below.
sudo apt-get update
sudo apt-get upgrade
Next you will install Java.
sudo apt-get install openjdk-8-jre
Then you will install Tomcat.
sudo apt-get install tomcat9
Now you will install GeoServer. Create a directory for your downloaded files.
sudo mkdir Downloads
Change directory to the new directory.
cd /home/ubuntu/Downloads
Download the zipped software file to the new directory.
sudo wget http://sourceforge.net/projects/geoserver/files/GeoServer/2.19.2
select the zip file
/geoserver-2.19.2-war.zip
Download the application to unzip
sudo apt-get install unzip
Unzip the file
sudo unzip geoserver-2.17.0-war.zip
Move the geoserver.war
sudo mv geoserver.war /var/lib/tomcat9/webapps/
Change directories and restart Tomcat
cd /var/lib/tomcat9/webapps/
sudo service tomcat9 restart
Next, you will log into Geoserver to make sure it is running. You will need the public IPv4 DNS for the AWS instance, which is available back on the EC2 Dashboard. You can click those little squares, and it will copy the address to the clipboard.

Open a new browser window and paste your public IPv4 DNS followed by :8080/geserver/web. (i.e. [YOUR public IPv4 DNS]:8080/geoserver/web) This will take you to the GeoServer administration page of your instance.

The default username is “admin” and the password “geoserver”. Log in and change this to keep your server secure.
Step 4. Create a PostgreSQL Database
You will need to create a Relational Database Server (RDS) to store your GIS data. GeoServer will pull data from the RDS, and you will be able to maintain the data by connecting to the RDS with desktop GIS software such as QGIS or ArcGIS Pro. Creating an RDS is similar to creating an EC2 instance; only you will create a server designed for handling data.
The process is pretty well documented on AWS’s website. So I will provide a below to this step. I do have a few suggestions. You want to select a free-tier eligible PostgreSQL server. The free-tier eligible servers are not available in the latest versions of PostgreSQL. Just click back to older versions until you see one that is free-tier eligible.
I would just do the first step of this tutorial. It instructs you to download and use SQLworkbench. I opted to use pgAdmin. Complete Step 1 and click launch, which will take you to the RDS dashboard. Select RDS to see your system’s details.
https://aws.amazon.com/getting-started/hands-on/create-connect-postgresql-db/
Step 5. Connect to the RDS with pgAdmin
You will need to download and install pgAdmin on your local computer. Amazon has good directions on how to connect using this database client.
https://docs.aws.amazon.com/AmazonRDS/latest/UserGuide/USER_ConnectToPostgreSQLInstance.html
Step 6. Install the PostGIS Extension on your PostgreSQL RDS
At this point, you have installed the RDS on AWS and connected using pgAdmin. You will need to add the PostGIS extension to be able for it to work with spatial data. In pgAdmin select Query Tool from the Tools dropdown menu. AWS has a list of SQL command that will add the extension. Note: For whatever reason, the /dn SQL command did not work on my machine. However, it was not necessary to install the PostGIS extension.
Step 7. Congratulate Yourself
You have just set up your open-source GIS architecture!
In my next few posts, I am going to discuss how to use your new GIS architecture. I will cover creating a new database schema, connecting to and managing the database with QGIS, working with GeoServer, and using the architecture to server data to a Leaflet map.